 By web dev
|
Posted on Jun 23, 2023
By web dev
|
Posted on Jun 23, 2023

Easy Step-by-Step Guide on Setting up GA4: A Detailed Guide
In the realm of digital marketing, understanding user behavior and tracking website performance is crucial for success. Google Analytics 4 (GA4) has emerged as a powerful tool for gathering insightful data and unlocking valuable information about your website visitors. In this step-by-step guide, we will walk you through the process of setting up GA4, empowering you to harness the full potential of this advanced analytics solution.
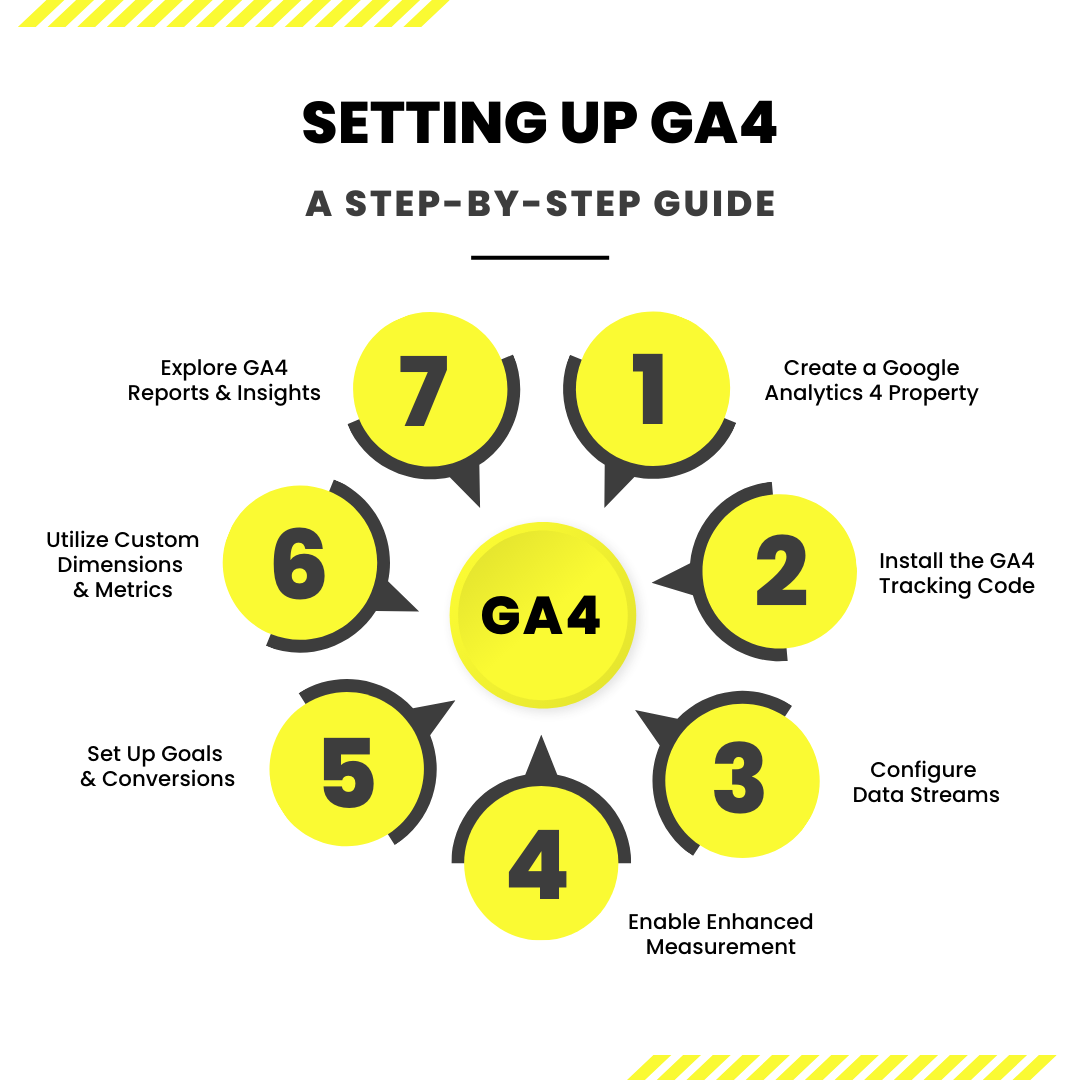
Step 1: Create a Google Analytics 4 Property
To begin, navigate to the Google Analytics website and log in with your Google account. Next, create a new property by clicking on the “Admin” tab and selecting “Create Property” under the “Property” column. Follow the prompts, providing relevant information such as property name, URL, and time zone.
Step 2: Install the GA4 Tracking Code
After creating the property, you will be provided with a Measurement ID. Copy this ID and paste it into the header section of your website’s HTML code. This allows GA4 to start collecting data from your website.
Step 3: Configure Data Streams
In GA4, data streams represent the various sources of data you want to track. To configure data streams, click on the “Data Streams” option under the “Property” column in the Admin tab. Add a new data stream for your website by providing the appropriate information, such as the data stream name and URL.
Step 4: Enable Enhanced Measurement
GA4 offers enhanced measurement capabilities, allowing you to automatically track events without manual implementation. To enable enhanced measurement, go to the “Data Streams” section, click on your website’s data stream, and toggle on the desired events you wish to track, such as page views, scrolls, outbound clicks, and more.
Step 5: Set Up Goals and Conversions
Define your goals and conversions to measure specific actions taken by your website visitors. In the “Property” column, click on “Conversions” and then “Goals.” Follow the prompts to create a new goal, specifying the desired action, such as form submissions, purchases, or newsletter sign-ups. GA4 provides various goal types and templates to choose from, making the process intuitive and flexible.
Step 6: Utilize Custom Dimensions and Metrics
Custom dimensions and metrics allow you to gather additional data tailored to your specific business needs. By defining custom parameters, you can capture valuable insights beyond the default tracking capabilities. In the “Property” column, click on “Custom Definitions” and explore the options to create custom dimensions and metrics that align with your unique requirements.
Step 7: Explore GA4 Reports and Insights
Once your GA4 setup is complete and data starts flowing in, you can access the Reports section to gain valuable insights into user behavior, audience demographics, acquisition channels, and more. GA4 offers a wide range of reports and visualization tools to help you understand the performance of your website and make data-driven decisions.
Setting up GA4 for your website is an essential step in unlocking the power of advanced analytics and gaining deeper insights into your audience. By following this easy step-by-step guide, you have equipped yourself with the knowledge to configure GA4, track relevant data, and utilize its powerful features to drive growth and make informed marketing decisions. Embrace the possibilities of GA4 and leverage its capabilities to propel your digital marketing efforts to new heights.